Showing posts with label Stylin' Saturday. Show all posts

Saturday, May 4, 2013

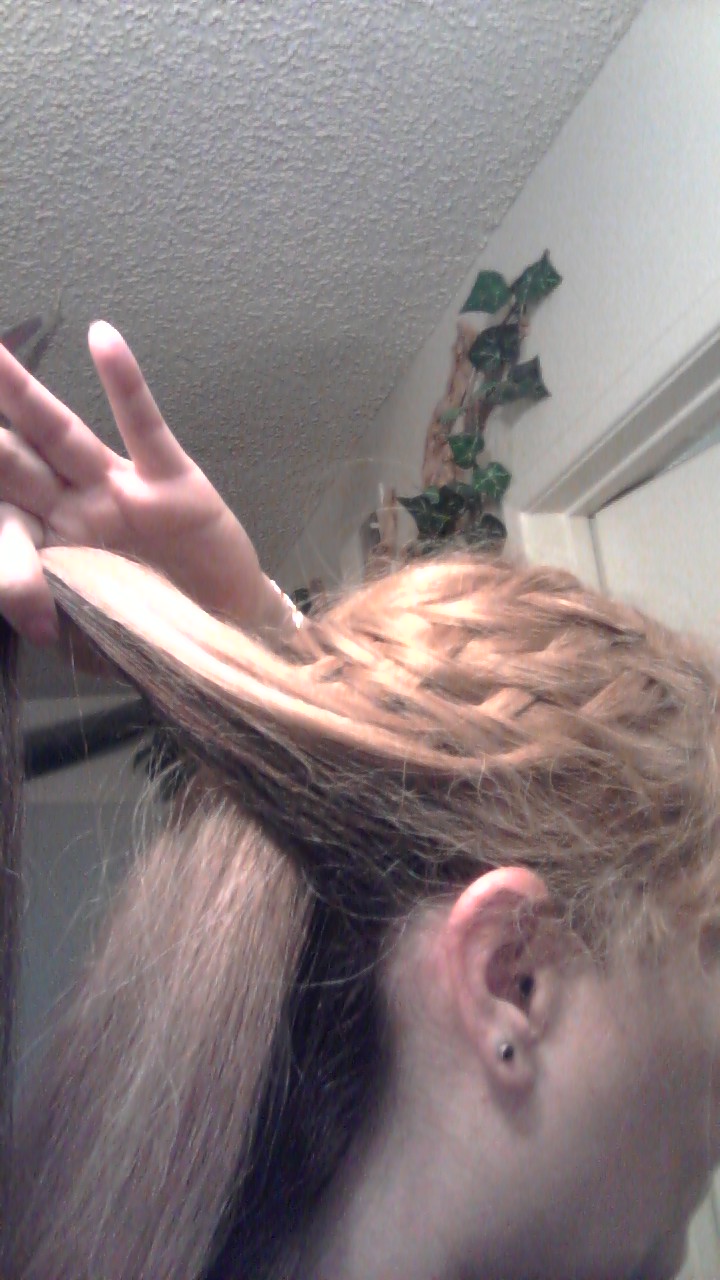
"Fantasy" Waterfall Braid-Stylin' Saturday

12:00 AM 0 Comments
 Today's style is in honor of Beltane week...a fun "maiden" sort of hairstyle perfect for Renaissance Faire.

Every since this blog where Bri chopped her hair for Locks of Love, she's been happy with the easy maintenance of the shorter style, but sometimes she misses the versatility of long hair and wants something different. This braid worked on her shorter hair just fine.

This fantasy "waterfall" braid is pretty much a lace braid that starts on one side and winds all the way around the head to the opposite side, except each time extra hair is added to the top strand and braided in, that strand is dropped and left alone. Another piece of hair beside this dropped strand is picked up to replace it. It's not hard to do, but the idea takes a little practice until you get the hang of it. Sometimes I find it actually easier to do on myself than on someone else, although that's probably because I've done this style on me more often.

If you're interested in learning this style, YouTube has several great tutorial videos--my personal favorite is THIS ONE. Hers is just gorgeous! But for the quick five minutes spent on each of us, this was a fast, fun style.


~~~~
I'm J. Rose Allister, wife, working mom, and the author of over twenty-five books. Somewhere in between one and the next, I love hanging out here on my blog and over on Twitter. Give me a comment or follow-I love chatting with people!


Saturday, April 27, 2013

The Hair Product You Can't Live Without! Stylin' Saturday

12:00 AM 0 Comments

A few weeks ago I posted about my favorite hair styling tool, my flat iron for wet hair. In that blog post, I mentioned another of of my can't-do-without products, and here it is: "one 'n' only" argan oil treatment spray.

Moroccan argan oil has gotten wildly popular these days, enough to where you can find shampoos, finishing products, and serums of this oil at drugstores and "big boxers" like Target. This product, however, is slightly different. I picked up this 6-oz bottle on a whim at Sally's. The best $9.99 I ever spent. It comes in a spray bottle that is just PERFECT for spritzing on dry or damp hair.

My hair is naturally dry, plus I torture it with regular bleaching and some use of hot styling aids. Not to worry--one 'n' only comes to the rescue! When my hair is feeling dry (often right after bleaching), I give each side a couple quick spritzes and brush it through well. I do this in the morning and again at night. The product smells wonderful and gives a nice sheen. And within just a few days, I notice a big difference in how silky and healthy my hair feels.

I also use this spray in addition to a heat protectant when using a flat iron or other hot implements. It not only takes the brunt of the heat, but the heat actually helps infuse the oil into my hair. A built-in hot oil treatment!

Ten bucks for a 6oz bottle may sound pricey, but that bottle goes a long way. My hair is long, thick, and dry enough that I use the spray almost every single day, plus I sometimes use it on my daughter as well. My current bottle is roughly half full after almost four months.

I honestly can't say enough about this oil spray. Grab some and give it a try for your brittle, dry hair--2-3 spritzes per side, depending on the length and thickness of your hair both morning and night, as well as whenever you use hot products. Hold the bottle 4-6 inches from your head and make sure to brush it through well to distribute evenly. If you get a little extra in one spot, brush well and it should distribute. If you get really crazy, your hair will look greasy. A spray of dry shampoo will fix it up.

Buy one 'n' only argan oil treatment spray online HERE. 

~~~~
On select Saturdays I post hairstyles we've tried at our house, ones we've seen online that we want to try, or hairstyling tips and tools.
I'm J. Rose Allister, wife, working mom, and the author of over twenty-five books. Somewhere in between one and the next, I love hanging out here on my blog and over on Twitter. Give me a comment or follow-I love chatting with people!-

Saturday, April 20, 2013

Pretty Flower Braid-Stylin' Saturday

12:30 AM 0 Comments

On select Saturdays I post hairstyles we've tried at our house, ones we've seen online that we want to try, or hairstyling tips and tools.

Okay, this week's style came by way of a friend of mine from work. She and I like to mess around with hairstyles and show each other pics we snap of our experiments. Brenda is a WHIZZ at braids, and when she showed me this style she did on her niece, I just had to share it with you here. Isn't this just so pretty? It really looks like a flower in back. This style looks complicated but really isn't--assuming you have  experience with braids. And it's definitely easier on someone else, but doable on yourself.

By the way, If you want to see some of Brenda's other photos, she's over on Pinterest. Give her some follow love!

How to do this style:

Begin with a side part. From the bigger side of the part, begin a Dutch French braid around to the back. When you reach the far side of the head, change directions and zigzag the braid the opposite direction (If you've not seen this done, check out THIS TUTORIAL).  Braid down to the end of the hair and secure with elastic. Now, take the braid and tug the loops on ONE side to loosen them and make them stand out wider--these will make the flower petals. (To see what I mean about tugging the braid, look at the photos in my Celtic 11-Strand Braid post). Coil the hair around the back of the head into a flower shape, making sure the loose "petals" are running around the outside. Pin into place. Tuck in the end of the braid and hide with bobby pins. How pretty for a date night, party, or special event!

Thanks, Brenda, for sharing this awesome style!


Saturday, April 13, 2013

Celtic 11-Strand Braid-Stylin' Saturday

12:30 AM 2 Comments
On select Saturdays I post hairstyles we've tried at our house, ones we've seen online that we want to try, or hairstyling tips and tools.

This week's style is a woven, Celtic-style 11-strand braid that I spotted on the Internet. That's right, ELEVEN strands woven into a single braid! It's not for beginning braiders, but it isn't as difficult as it sounds, either. 

Here's the effect when the braid is finished: 

You'll probably notice a few "flyaway" strands on this braid, which happened because I was in a hurry the day I shot this style. If you get a lot of flyaways, this style goes a lot easier if you begin with wet/damp hair or apply styling gel first. This is also MUCH simpler to do on yourself if you pull your hair into a side ponytail (instead of trying to braid this along the back of your head).

The 11-strand braid isn't truly done by working with 11 strands all at once. The trick here is to do a 5-strand braid--I'll teach you how in a moment--and then weave two regular 3-strand braids in on either side. The end result looks complicated enough to have taken you forever, but this only takes maybe 15-20 minutes for a beginner and as little as 10 once you get the hang of it.

HOW TO DO AN 11-STRAND BRAID:

1. Pull hair into a side pony (assuming you're braiding on yourself) and secure below the ear with an elastic. Then section the hair into three pieces as if you were going to braid it normally, EXCEPT make the middle section much wider than the others. This middle section will be the 5-strand braid, so you need more hair.

2. Clip/pin the two smaller outer sections up out of the way for now and divide the wider center section into 5 equal strands, like shown here ~~>

3. Just like with a 3-strand braid, always start with an outside strand and fold it in. For this braid, take an outside piece (from either end, doesn't matter which you start with) and weave it over its neighbor and under the middle strand. Now that piece becomes the new middle strand.


Weave over, then under
4. Pick up the outer strand on the opposite side and do the same thing: weave it over its neighbor strand and under the middle, making this piece the new middle strand.

5. Repeat with the opposite side: over the neighbor and under the middle. Keep alternating outer strands and weaving over/under until you run out of hair.

6. Once you've finished braiding, you'll have something weird like shown below. Don't panic! Work the magic by holding the lower end of the braid while slightly tugging on the outer edges as shown in the second photo.
Funky-lookin' braid
Tug gently up/outward all along edges on both sides to loosen/define braid
Presto! Now we're getting somewhere

7. Now it's time to pull down the two side sections and weave in the 3-strand braids. Working with one side section at a time, split it into 3 strands and begin a normal braid (end over middle, other end over middle) for one section. ~~>


Fingers poke through loop
8. <~~ Before beginning the next section, find the first outer loop of the 5-strand braid and poke your fingers through as shown at left. Now pull the closest outer strand of the 3-strand braid through that loop, weaving the two braids together. Continue braiding that next section.

Hair pulled through loop of 5-strand braid--now braid into 3-strand braid
 In effect, you are finger-weaving this new 3-strand braid into the 5-strand braid so the two are connected at the start of each section. Keep going until you reach the bottom of the braid, then secure both braids together with a single elastic.

Closeup of finger pulling strand through
9. Repeat this on the other side with the other reserved section of hair, weaving through the 5-strand loops on that side on the way down. When you get to the bottom, pull out the previous elastic and secure all three sections together.  By the way, a small topsy tail tool can be helpful for pulling strands through the loops of the 5-strand braid, as shown here ~>

A LARGE crochet hook (size Q) could work too.

<~~This is what you'll have at this point, which is pretty cool...

...But do the magic trick where you hold the end of the braid and tug out on the outer strands to loosen the whole effect, and you'll get a much better defined braid, like shown below.


Tug, tug tug...


...and the braid looks wider and fancier


I hope this how-to is clear enough for you to follow. Feel free to post any questions in the comments below. And Happy Stylin'!


~~~~

J. Rose Allister is the author of over twenty books. Somewhere in between penning one and the next, she enjoys hanging out here on her blog and on Twitter. 


Saturday, April 6, 2013

Flat Iron for Wet Hair! Stylin' Saturday

12:50 AM 0 Comments
On select Saturdays I post hairstyles we've tried at our house, ones we've seen online that we want to try, or hairstyling tips and tools.

Shhh...I have a sordid confession to make. I'm engaged in a torrid love affair worthy of my naughtiest erotic novel. The source of this passionate devotion: my flat iron.

 This isn't just another flat iron any more than the hero of a seductive romance tale is just another guy. This smoldering wonder is the Remington Wet 2 Straight, which has plenty of settings to heat things up and an impressive enough girth for any erotic writer--ceramic plates that are a full 2 inches wide and treated with soy hydra complex to add shine.

I should start off by saying I have a long, bloody history with trying to straighten my hair. Outside paying for a salon blowout, which still has been known to net the dreaded poofy frizz my husband calls my "big hair", my mane refused to behave. Not to mention I don't have a lot of patience for the near two-hour process of blow-drying and straightening just to get lackluster results. On one notable occasion, the night of my school reunion, I spent three hours determined to tame the beast. I finally gave up, wet my hair down, and let it have its way.


To give you a visual, here's a shot of how my hair wants to be when left to its own devices. Yep, pretty darn wavy. It's also thick, long, and coarse.  My hair and I argue regularly over who is in control. And no, this is not my natural color--I bleach it. Quite a bit. Meaning it can and will get as dry as straw on a summer day. Add to that my general lack of time and patience and one might advise me to give up this whole nonsense of straightening altogether. But hey, like many others who secretly want the greener grass over the fence, there are days when I just plain want something different.

I saw this flat iron and was intrigued by the idea that it could work on wet hair, eliminating the whole blow drying step. Reviews for the most part looked promising, as did the price: under $28. After using this modern wonder, I would have happily paid more, says the woman who is forever seeking a cheap deal.

My first time out, I decided to go for the gusto and try this on wet hair. I had recently bleached from roots to ends, so my hair was admittedly not in its best shape. I deep conditioned before trying this and finished off with a dollop of conditioning oil and a leave-in conditioner. My hair wasn't dripping when I started, but it was still fairly wet after 20 minutes up in a towel while I dressed and did my makeup. Nevertheless, my hair went from wet and curly to dry, silky, and pin-straight in a mere 40 minutes. If I begin with just slightly damp or dry hair, that time can drop to 20-30 minutes--a fair miracle considering my hair length/type.

Here's how my hair looks after straightening wet hair with the Remington:


Sorry for the weird camera angles. It's kind of tough to snap shots off my phone with my hair at this length. But hopefully you get the idea.

The only "meh" thing I can say about this product is while the wide plates are great for doing a larger volume of hair, it does make the iron heavier and trickier to manage. I find I need to change hands frequently. If I had wrist problems, I'd probably want the narrower version that is available. Also, you do have to be aware that when working with wet hair, steam escaping the vents can burn you if you aren't careful what direction they're pointing. But hey, all romantic heroes have flaws. And I'm enamored enough with this product to consider naming a future book hero after it. (As in Remington, not Wet to Straight, although that would lend a rather interesting connotation to an erotic novel.)

When I was reading reviews, I did see some complaints about this not straightening wet hair or that it damaged hair. Here are some suggestions for anyone considering this (or any wet-to-dry) iron:

1. If you're straightening wet/damp hair, you have to make sure the hair is TOTALLY dry before you stop or it will get frizzy/wavy. You'll have to run the iron through multiple times, especially at the roots where it takes longer to dry. If your hair is at all like mine, you might notice a discouraging stage where the hair seems dry, but you have a poofy, "big" result rather than silky straight. Don't give up--keep going. It just means it's not quite dry enough. It'll smooth down as you finish the job. (If need be, add another quick spritz of protectant and some oil or frizz control serum.)

2. To avoid damage, definitely use a heat protectant spray made for this purpose. I use that plus a few spritzes of Moroccan argan oil since I'm paranoid about my bleach-dried hair.

3. Even if you use all of the above, damage is still possible if you flat iron incorrectly. Don't run the iron through too slowly OR too many times in a row in the same spot. Either can burn the hair. When my hair is quite wet, I run it through at most 2-3 times before moving to another section. (Once or twice max for fine/heavily damaged hair.) I go back through sections later as needed after they cool down. Since it takes me several passes for wet hair, I don't run the iron all the way out to the ends every time. I run it through once, then focus on the roots for a bit until fairly dry. That way, I'm not applying as much heat to the ends, which take damage and split easier.

4. Make sure you aren't using too high a heat setting. Coarse hair can generally tolerate higher heat than baby fine hair, and dry hair generally needs a lower setting than wet. Also consider lower settings for color treated or otherwise damaged hair. It's better to start lower and work your way up than to scorch your hair.

5. Give hair a break so it won't break. Don't use hot tools on hair all the time; give it rest. And definitely treat it to regular deep conditioners.

If you're interesting in purchasing this straightener, I've seen at Wal-Mart and Target (where I got mine), and it's also available on Amazon (free shipping!) here:

Remington Wet2Straight


J. Rose Allister is the author of more than twenty-five books, primarily romance and erotic romance. A former editor and submissions director, she now works as a mild-mannered hospital secretary by day, naughty writer by night. Connect with her on Twitter or Goodreads. She loves talking to people!

Saturday, March 30, 2013

Easter Flower Basket Hairstyle-Stylin' Saturday

12:30 AM 0 Comments
On select Saturdays I post hairstyles we've tried at our house, ones we've seen online that we want to try, or hairstyling tips and tools.

Version 1
Version 2
Although I'm working my "other job" all Easter weekend, I figured there was no reason I couldn't still have fun with some nifty Easter hair. After scouring the Internet, I saw several different styles that I decided to mesh into two versions of what I call my "Easter Flower Basket" hairstyle.

 Version 1 is basically a basket weave topknot/half ponytail (whichever name you prefer) with a flipped pony and flower decorations. For Version 2 the hair is pulled around in a side pony and braided or left hanging.

For the basket weave, I will say that a topsy tail tool is almost a must, as trying to weave strands with your fingers is darn tough. If you're not familiar with the topsy tail, here's what it looks like:

You can find it online, at Target, or at some drugstores that have an "As Seen on TV" aisle.

HOW TO DO THE BASKETWEAVE:

1. Start a half-ponytail (aka topknot) in your hair as usual, BUT section off a strip of hair from both sides of the top center part first, as shown here. Leave this hair out of the half pony. You should have about 1/2-inch thick strip all along each side of the part. 

2. Make the rest of the half pony as usual, leaving out the section of hair from the top part. I then like to "flip" the pony using the topsy tail tool (or fingers works for this) just to make it look fancier. If you're not familiar with how to do a flipped ponytail, try a search on Google or YouTube. It's easy!

3. Now let's deal with the madness we have by leaving the top of the hair out of that pony. Find your center part and let the sectioned strips fall to either side. Split each side into four pieces. These are the strips we will weave through the half pony we just made.

4. Work on one side of the part at a time. Take the first (closest to your face) of the four strands you separated and thread it through the topsy tail tool. Then use the pointed end of the tool to weave over and under sections of the half pony. Pull the strand of hair all the way through.

5. Repeat this with the second strand, only this time, go under and over the pony in the opposite weave as the last strand (when you went over/under before, now go under/over). Alternating where the hair weaves above and below the pony hair is what gives the basket weave appearance. This is much easier to do on yourself if you position mirrors to see the side of your head.

6. Keep going with the remaining strands, alternating over/under and under/over each time until all four strands are used. Then do the same thing on the other side of your head.

If you're doing Version 1, that's it! You can make this into a "flower" basket by adding flowers to the back of the style, as I did, add a ribbon bow, or just leave it plain.

VERSION 2:

Simply take all the hair hanging in the back and pull it smoothly around to one side, then secure with a ponytail elastic and decorate with flowers/ribbons. OR do as I show here by starting on one side by the ear and working your favorite braid around the back (French, Dutch, or lace) to the other ear. Then secure with an elastic (or braid all the way down to the end) before decorating with flowers.


 Have fun with this and don't be afraid to experiment! Happy Stylin'!


J. Rose Allister is the author of more than twenty-five books, primarily romance and erotic romance. A former editor and submissions director, she now works as a mild-mannered hospital secretary by day, naughty writer by night. Connect with her on Twitter or Goodreads. She loves talking to people.


Saturday, March 23, 2013

Locks of Love-Stylin' Saturday

12:30 AM 0 Comments
On select Saturdays I post fun hairstyles my daughter and I find online and recreate at home.

Well Bri finally got her wish...we chopped her ponytail off! After growing her hair out for a year to donate to Locks of Love, we managed to cut 12 inches and still leave her with a not-too-short bob hairstyle that looks just adorable on her. Here's a few shots we snapped of the process:
I put elastics in her hair, one just below the point where I would cut it, plus one near the bottom to keep the donated hair neat

Chop, chop! She looks slightly shell-shocked to have her 12-inch ponytail in hand!

A little neatening up of the ends and voila! A darling bob.


Bri was so funny about this. She kept going back and forth between missing her hair and saying, "What have I done?" to spinning around laughing and saying, "I LOVE it!!"  If you ever saw the scene in Tangled where Rapunzel is flip-flopping between "Best day ever!" and "I'm the worst daughter in the world," that's exactly how the first twenty minutes post-haircut went. I had some trepidation about cutting off her long, silky hair, but she wanted it short and it was for a good cause! The final verdict: the new style is a big hit. She loves it and Mike and I think it suits her well!

If you aren't familiar with Locks of Love, it is an organization that helps provide hairpieces to children with certain types of hair loss, such as those suffering from alopecia or undergoing cancer treatment. For more information on donating, visit http://locksoflove.org.


J. Rose Allister is the author of more than twenty-five books, primarily romance and erotic romance. A former editor and submissions director, she now works as a mild-mannered hospital secretary by day, naughty writer by night. Connect with her on Twitter or Goodreads. She loves talking to people.

Saturday, March 9, 2013

Carousel Braids and a Twist!-Stylin' Saturday

1:56 AM 0 Comments
On select Saturdays I post fun hairstyles my daughter and I recreated off YouTube (or Pinterest).

Between Bri's awful cold/double ear infection and my hard drive crash, we still haven't gotten back into the swing of posting videos. However, we did play around with some hairstyles this week, so I thought I'd post a few shots I took of the finished products.

 This carousel lace braid was fun to do and only took a few minutes, which was helpful when Bri wasn't feeling well enough to sit patiently through getting her hair dolled up.


 This spiral ponytail has quickly become a favorite of mine because it's fast, easy, and gets a lot of compliments. It's simple to do on myself as well as on Bri. Also, if this style is done on damp hair spiraled over a headband until all hair is used, it can be slept on overnight to produce some really cute wavy curls.


This braid goes one way, then curves back the other direction. It was super fun to make and looked really pretty. I wore a version of it to work (but I couldn't get the braid to change direction on the back of my own head so it hung down the right side), and I got more compliments on it than any of the others I've tried on myself thus far.


Bri has been begging me to cut her hair, and I think this weekend we'll finally settle on a style and go for it. She wants it pretty short, so we'll see how that plays out with doing fancy braid styles like these. Wish us luck!


J. Rose Allister is the author of more than twenty-five books, primarily romance and erotic romance. A former editor and submissions director, she now works as a mild-mannered hospital secretary by day, naughty writer by night. Connect with her on Twitter or Goodreads. She loves talking to people.

Saturday, February 16, 2013

Sock Buns-Video!-Stylin' Saturday

1:43 PM 0 Comments
Okay, I've got a brand new feature to go along with a brand new video series I'm starting with my little girl. Every week, we will pick out a hairstyle seen on YouTube for inspiration and will attempt to recreate a version of it at home.

Our first attempt was double sock buns, which were easy to do, looked adorable on her, and as a bonus, she slept in them and woke up to a beautiful set of curls! (I did a sock bun too, and you can see the results for us both below.)


~~~
J. Rose Allister is the author of more than twenty-five books, primarily romance and erotic romance. A former editor and submissions director, she now works as a mild-mannered hospital secretary by day, naughty writer by night. Connect with her on Twitter or Goodreads. She loves talking to people.


Visits To This Blog: