
 |
| Version 1 |
 |
| Version 2 |
Version 1 is basically a basket weave topknot/half ponytail (whichever name you prefer) with a flipped pony and flower decorations. For Version 2 the hair is pulled around in a side pony and braided or left hanging.
 For the basket weave, I will say that a topsy tail tool is almost a must, as trying to weave strands with your fingers is darn tough. If you're not familiar with the topsy tail, here's what it looks like:
You can find it online, at Target, or at some drugstores that have an "As Seen on TV" aisle.
HOW TO DO THE BASKETWEAVE:
 1. Start a half-ponytail (aka topknot) in your hair as usual, BUT section off a strip of hair from both sides of the top center part first, as shown here. Leave this hair out of the half pony. You should have about 1/2-inch thick strip all along each side of the part.
  2. Make the rest of the half pony as usual, leaving out the section of hair from the top part. I then like to "flip" the pony using the topsy tail tool (or fingers works for this) just to make it look fancier. If you're not familiar with how to do a flipped ponytail, try a search on Google or YouTube. It's easy!
3. Now let's deal with the madness we have by leaving the top of the hair out of that pony. Find your center part and let the sectioned strips fall to either side. Split each side into four pieces. These are the strips we will weave through the half pony we just made.
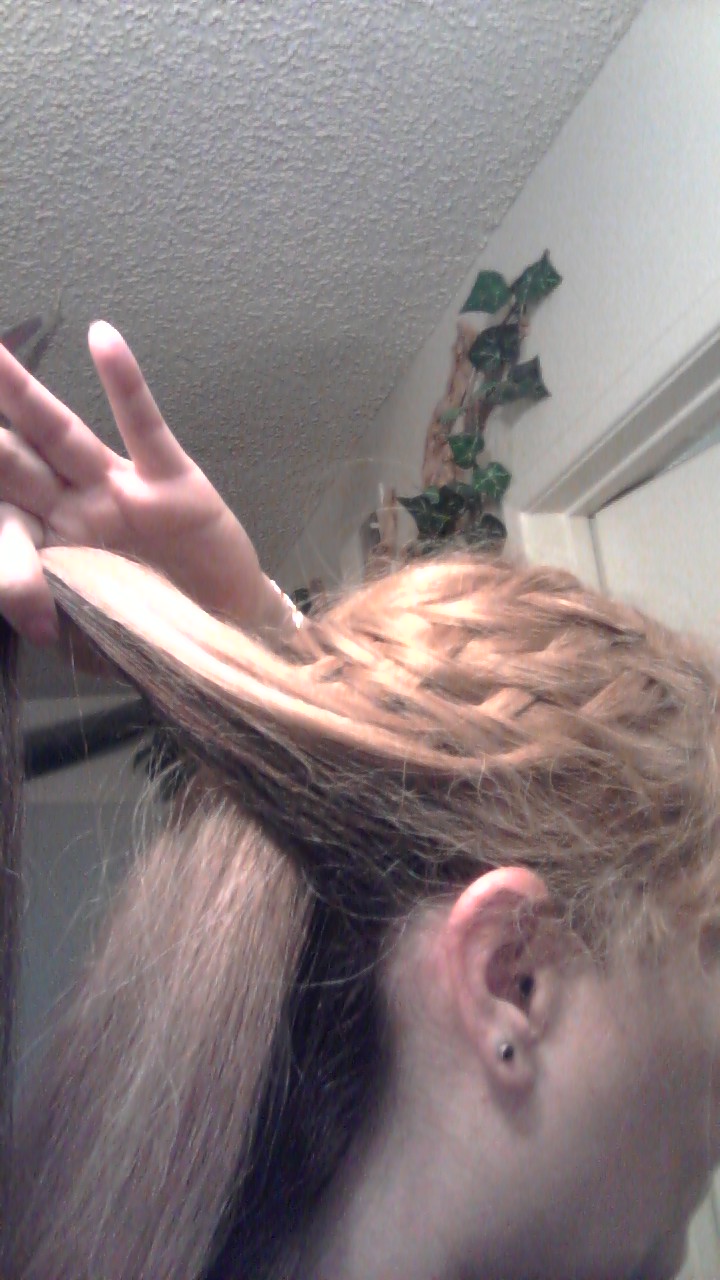
 4. Work on one side of the part at a time. Take the first (closest to your face) of the four strands you separated and thread it through the topsy tail tool. Then use the pointed end of the tool to weave over and under sections of the half pony. Pull the strand of hair all the way through.
 5. Repeat this with the second strand, only this time, go under and over the pony in the opposite weave as the last strand (when you went over/under before, now go under/over). Alternating where the hair weaves above and below the pony hair is what gives the basket weave appearance. This is much easier to do on yourself if you position mirrors to see the side of your head.
6. Keep going with the remaining strands, alternating over/under and under/over each time until all four strands are used. Then do the same thing on the other side of your head.
If you're doing Version 1, that's it! You can make this into a "flower" basket by adding flowers to the back of the style, as I did, add a ribbon bow, or just leave it plain.
VERSION 2:

 Simply take all the hair hanging in the back and pull it smoothly around to one side, then secure with a ponytail elastic and decorate with flowers/ribbons. OR do as I show here by starting on one side by the ear and working your favorite braid around the back (French, Dutch, or lace) to the other ear. Then secure with an elastic (or braid all the way down to the end) before decorating with flowers.

Have fun with this and don't be afraid to experiment! Happy Stylin'!
J. Rose Allister is the author of more than twenty-five books, primarily romance and erotic romance. A former editor and submissions director, she now works as a mild-mannered hospital secretary by day, naughty writer by night. Connect with her on Twitter or Goodreads. She loves talking to people.
No comments:
Post a Comment